Showing posts with label cotton. Show all posts

Sunday, January 22, 2017

The Process 003: Dyeing Cotton Lint the Best Way

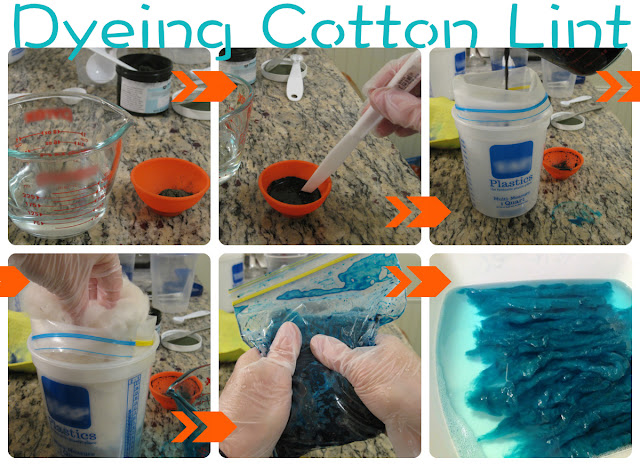
So it happened. I dyed cotton lint and it actually came out the intended color. Some other folks, including yours truly, have tried and failed to get decent color out of dying raw cotton, and then told ourselves that it was still pretty enough. I pretty much followed the same steps as I did before in the cold-batch direct application method, only using less dye. To recap, here's how you prepare:

Intructions

  1. Don't even bother washing your fibers unless they are really dirty, and in that case, I don't know how to help you without creating tangles. Yes, the fibers are coated in a natural waxy cuticle, but it just doesn't seem to matter whether you wash that off or not.
  2. Carelessly comb your fibers into loose logs or card into loose rolags. Loosely, so that you have an easier time getting the fibers saturated in dye. The rest of these instructions assume you have one ounce of fiber prepared in this way.
  3. Put your safety gear on, including but not limited to goggles, gloves, and face mask.
  4. In a container that is easy to pour from, dissolve 1 1/2 teaspoons of urea in a 1/2 cup of water.
  5. Measure 1/2 teaspoon of dye into a small dish. (With the exception of dyes marked * or ** Scroll to the results section for an explanation.)
  6. Add a little bit of the urea-water to the dye and use a palette knife to paste up.
  7. Add the paste-up to the urea water and stir until complete dissolved.
  8. Dissolve 1/2 teaspoon of soda ash to the dye mixture.
  9. Pour the mixture into a quart-sized resealable bag.
  10. Stuff some of that cotton in there.
  11. Overcome your emotions, such as doubt, regret, and fear. You will make it all fit. Try prodding it and squishing it with your gloved hands as you go.
  12. Seal the bag while carefully squeezing out the air.
  13. Massage the bag gently without ripping the bags. Make sure you penetrate all fibers. You can check by opening the bags, but be prepared for a mess.
  14. If your dye has turquoise in it, put the bag in a pot of warm-hot water to bring out the greener hues.
  15. Let those bags sit overnight.
  16. Rinse fibers until water runs clear. Please consider methods to save water. I actually took a shower with my fibers in a wash basin. After the first rinse to get the bulk of the excess dye out, I let the fibers soak with some professional textile detergent for about a day before doing a final rinse.
Let the fiber dry. Once that's done you could probably just spin directly from what you've got, but I'm going to re-comb everything again.
The above graphic might give you a little insight into my process and what sort of supplies you will need to gather. Speaking of which:

Supplies

Consumables:
You'll notice that the minimum amounts offered are not only cheap, but more than enough to complete this project, so I don't know why people even bother with the sub-par dyes available at craft and grocery stores for what is going to end up being a pretty labor intensive endeavor. It's worth it. Get good quality materials.

Non-consumables:

It should go without saying that these materials should be dedicated to art and never used again for food.
  • Pourable container: Should be able to hold at least one cup for this particular project, but maybe more if you're planning to do larger batches. Glass is best because it's super easy to clean, but plastic is okay.
  • A small dish: This is to paste up the dye. My little orange dish is silicon. It was okay. As you can see, there was a lot of waste. I think next time I'll try to get a hold of some watch glasses.
  • Teaspoon set
  • Palette knife: Two or more would be nice. They are great for leveling your teaspoon and for making your paste-up.
  • Sealable plastic freezer bags: Don't go cheap. These need to withstand a certain amount of abuse otherwise you'll have a mess on your hands, floor, and every other surface. I find the quart size to be most manageable. If you are making larger batches you can either use a gallon size, or separate into multiple bags. These can be rinsed and reused until they fall apart.
  • Plastic bucket: Just to stabilize the bag while pouring the ingredients and cotton. Quart size for a quart-sized bag, gallon for gallon.
  • Metal sieve: to rinse your dyed cotton.
  • Tub: To soak your dyed cotton.
  • Safety gear: Goggles, face mask, gloves.
  • Cleanup supplies: I have one big cellulose sponge and then several sheet sponges (seen in yellow in the above photo.) I like to set my materials on the sheet sponges so any drips get absorbed instead of dripping onto the counter. (Which I failed to do in the third photo.)

Results


Here comes the payoff!


What you see above includes three dried and combed examples from my latest experiment and one from the lightest result of my previous experiment. The dye I used was Dharma Trading's fiber reactive Jade Green (50). In the bottom photograph, I placed the fibers against the Jade Green swatch for comparison. From these photos it seems clear that the far left example is the closest match, but I'll add that in person, that batch looks washed out (and that may be what you want). The most vibrant and closely matched to the swatch is actually the second from the left, though in the photograph it doesn't look much different from the second to the right sample. All I can say is, look in the highlights and not the shadows, otherwise they all seem too dark.

Speaking of too dark, ha ha, check out the far right. Holy moly, what a waste of dye that was!


Jade Green
¼ tsp dye per ½ cup of water
1:96 ratio
½ tsp dye per ½ cup of water
1:48 ratio
¾ tsp dye per ½ cup of water
1:32 ratio
1 tsp dye per ½ cup of water
1:24 ratio


In conclusion, I will be using a 1:48 dye to water ratio (1/2 teaspoon of dye for every 1/2 cup of water) in most further projects. It gives the closest match to the swatch. It should be noted that not all of the colors require the same amount of dye. If you're buying from Dharma, colors marked with * require double the amount of dye and those marked ** require four times as much dye. If I did another batch of Cobalt Blue, that means instead of a half teaspoon, I'd use a whole teaspoon.

Thursday, July 21, 2016

Science of Craft: 003 The Structure of Cotton Fiber


Surely you've heard the fairytale of Rumpelstiltskin. Some chick finds herself in a predicament that requires her to turn hay into gold thread otherwise she'll be executed. Luckily some woodland spirit named Rumpelstiltskin comes to her aid in exchange for the distressed damsel's first born. Things turn out pretty much how one might expect. Now, if you know about bast fibers, you might be heckling our heroine from the sidelines. Congrats, you are the real life Rumpelstiltskin. Certainly, you're not going to be making anything out of hay, but our girl is probably mistaking flax for hay. But she's not the only idiot. The king who wanted her to make gold thread was only ever going to get linen, which is a wonderful material in its own right. Too bad they didn't have Pinterest back then, where they could have learned to class anything up with a spritz of metallic Krylon. Anyway, I grew up enjoying Shelly Duvall's Fairytale Theater, and looking back on this scene (10:54), it's especially hilarious to me now. What a good show.


Now, try suspending judgement on our poor heroine for a moment and try empathizing with her incredulity about spinning plant fiber. It does seem pretty weird, but it's amazingly doable as long as you can find a way to get at the cellulose that makes up every plant. In case you forgot, here's what I'm talking about.

One cellulose unit


This is a unit of cellulose, which has such wonderful properties which human beings have found many uses for. It's part of what makes up the fiber in our diet, it's what makes up the lumber we use, the pulp in our paper, and the plant fibers that we spin. However, there are a couple of factors, polymerization and crystallinity, that make any given source of cellulose better suited for one application or another.

Polymerization

Take a look at that cellulose unit again and notice the oxygens (in red) seemingly just hanging off the ends. That's where the cellulose units attach to each other. These attachments are particularly strong bonds known as covalent bonds. That's when a couple of atoms actually share electrons with each other. For cellulose in particular, the connection between the sugar subunits is called a glycosidic bond, and they always occur on the first and fourth carbons, connecting unit to unit, to another unit, and another, and so on, which makes a polymer. Polymers are molecules made of long chains of smaller units repeated together. A good analogy for polymers would be pop-beads. The beads would represent individual atoms and the "pop" part would be the shared electrons.

The longer the polymer, the better it is for whatever you're doing with it. When making paper, using long cellulose fibers makes a sturdier, more flexible paper. You've experienced this if you've ever noticed the difference between drying your hands on recycled paper towels and using some premium brand like Brawny or Cottonelle. Whenever we recycle paper, those polymer chains get damaged and broken, thereby shortening them. I once had a student insist on using the crummy brown paper towels to make recycled handmade paper. Besides the fact the she wasn't really recycling anything by unwinding the roll of fresh unused paper towels, the paper came out extremely weak and friable, just like I told her it would. There's only so many times you can recycle cellulose fibers until they are too short to do anything with.

It may not be surprising that paper makers often add cotton to their paper pulp to enhance the quality of their paper. I know my interviewers must have been impressed with the cotton stock I printed my resume on. Anyhow, I'm saving the short fibers left over from my cotton spinning and will see if they help a all with my paper making. Of course, the longest fibers are more desirable for spinning, but cotton is notoriously short (usually no more than an inch) compared to animal fibers which intimidates a lot of people, but obviously it's got a long enough staple length because people have been spinning it a very long time. One just needs to use different techniques and make a few adjustments to existing equipment to spin cotton, and someday I will go on at length about it.

Crystallinity

I hope you haven't been equating a single cellulose polymer with a single cellulose fiber. Cellulose fibers are actually a much more complex arrangement of many polymers bonded together more or less in parallel. The more parallel and tightly packed the polymers are, the higher the degree of crystallinity is. This makes cotton pretty strong, especially when wet, a feature animal fibers can't claim.

The hydroxyl groups that are key in dyeing of the fiber, as we have learned, but they are also what gives cotton its high degree of crystallinity, because they are so very attracted to each other. This is due to something called polarity which creates the condition for hydrogen bonds to form. This won't be difficult to understand if you can stick with me. Ha. You know how opposites attract? That's all that's really going on here, and in this case the opposites are negative and positive charges. The oxygen has a slight negative charge and the hydrogen has a slight positive charge.
This unbalance didn't just happen for no reason. Oxygen is a greedy asshole, and in bonding covalently with hydrogen, doesn't share the electron quite fairly. It's like if you were to split lawn mower ownership with your neighbor, and yet it spends more time in your neighbor's garage than yours. The lawnmower represents the electron in this analogy, keep up with me here. Anyhow, electrons have a negative charge, and because oxygen is bogarting the electrons, the oxygen ends up being more negative and the hydrogen ends up being more positive.

If the hydroxyl group from a cellulose polymer encounters a hydroxyl from another molecule, the positive hydrogen is going to be attracted to the negative oxygen of the other hydroxyl group. This attraction forms the hydrogen bond. It's not as strong as a covalent bond, but considering how many potential hydrogen bonds could be formed all up and down a cellulose fiber, overall, that's going to make a pretty tough fiber. The more hydrogen bonds form with adjacent cellulose fibers, the more closely organized in parallel the polymers become. This is crystallinity.

A hydrogen bond between the hydrogen in a
hydroxyl unit and the oxygen in water.
You know what else has Hs and Os bonded in it? Oh come on, do I have to spell it out for you? H two Ohhhhhhhh, now you get it don't you? Now remember, oxygen is an asshole, even in water. It has a slightly negative charge and water's hydrogens have a slightly positive charge. When water meets a cellulose fiber, the water becomes attracted to the hydroxyl groups in the cellulose. That's why I have 100% cotton bath towels. Nothing dries your butt crack better.

Fiber Structure

If you've got good eyes, it's pretty easy to tease out a single cotton fiber and look at it. That is not one polymer chain. It's not even a bunch of polymer chains hydrogen bonded together. One cotton fiber is actually many layers of crystalline cellulose chains arranged in different ways, and this is what makes cotton so splendid and easy to work with. Some of the layers are twisted, which makes the fiber strong. The fiber structure of cotton is pretty consistent, having a diameter of about 12-20 micrometers. The result is a fiber that is smooth, soft, and not irritating like wool is. Fine Merino is comparable.

Cotton is so great. It comes right off the plant this way. You can't just start spinning trees you know, even though they contain a lot of cellulose. In order to "spin trees" you have to remove all of the lignins and other compounds to get at the cellulose, and by that time you just have a bunch of unspinnable pulp left over, so then you'll have to chemically polymerize the pulp, which will never be as long or strong as cotton polymers. What I just described there is how rayon is made. Through some physical effort, bamboo, and bast fibers like linen and hemp, can be processed into spinnable fibers. Cotton, though, is a clear winner for me.


If you want to know more, here are a couple of more technical pages on the structure of cotton. Have at it!

Monday, July 4, 2016

The Process: 002 Dyeing Cotton Lint (Cold-Hearted Batch)

I was disappointed with the results from both tub-dyeing and direct application, so I tried something similar to the method I used when I brushed fiber reactive dye directly onto fabric, only leaving out a thickener since I won't be applying the dye as one would apply paint. I was pretty happy with my results from my painting, but unfortunately I don't have any photos. The process involves making a batch of chemical water, which includes urea and sodium alginate. The urea helps dissolve the dye, thereby increasing your yield, and it also keeps it wet, which is necessary for the reaction between the fiber and the dye. The alginate is the thickener, so I left that out. The sketchy part is once you add the dye to the chemical water, you also add the soda ash. This means you need to use the dye within the hour. While soda ash raises the pH, which makes it easier for dye particles to react with the fiber, soda ash also reacts with the dye itself, making it inert. That made painting very nerve wracking. There's no fussing about and no carrying on a painting for longer than an evening. However, I'll be applying the dye to my cotton almost immediately so hopefully the time limit won't matter. Since I had such good results with my painting, I'm feeling a little more optimistic here.

The reason I'm changing the way I'm doing this is because in my previous trials, the cotton was still saturated with liquid by the time I applied the dye, which I suspect caused the pale colors. I'm also unhappy with the state of the cotton after the process was over. Though I was careful, a lot of the cotton is moderately ropey now. It's not unusable, but will definitely be a pain to process into something spinnable. Also, during the process, the clumps of cotton developed air bubbles which may have also affected the availability of the fibers to the dye.

3 ounces of roughly combed cotton
To address these issues, I combed my cotton into foot-long roving like logs. You would probably card them into loose rolags. Nobody I know of hand-combs cotton. Just me, because that's what I have. Combs. Anyway, my idea was that in organizing the fibers ahead of time the cotton will be easier to handle during and after the dying process, and hopefully will make the fibers more available to the dye.

It was a huge pain in the ass, and I kept having to remind myself to do a shitty job since I wasn't going to be spinning yet. I just needed enough effort to roughly organize the fibers. Look at all of that, and it's only 3 ounces! I've got about a pound more to do in the future.

Washed cotton logs drying in the sun
Wearing exam gloves, I washed each log individually with PTD, and then rinsed them in a wire strainer. Then I let the suckers dry. Actually, I ran the hair dryer on them for awhile, but damn it, I had already spent enough time with these guys, so eventually I just crossed my fingers that they wouldn't blow away or get stolen for nesting material, and put them outside in the sun. I took a bike ride to the cafe and had some espresso. That was more fun than running the hairdryer.

Once the cotton was completely dry again, I was ready to dye. My idea was to use the recommended amount of dye per volume of water for one batch, and then increase the proportion of dye in two more batches. I planned to do this for two different colors, 22 Cobalt Blue, which requires twice the amount of dye as most of the dyes, and 50 Jade Green, which requires the standard amount of dye, but because it has a tiny amount of copper in it, it does better when exposed to heat. What's this now? What happened to Deep Orange? Honestly, I do not need any more orange fluff. Changing colors certainly makes this experiment harder to compare to previous methods, but as long as the outcome is intense, as opposed to pastel, I will be happy. Anyway the following table is the result of a lot of math:


Cobalt Blue
Jade Green
Recommended Amount of Dye
2 tsp dye per ½ cup of water
1:12 ratio
1 tsp dye per ½ cup of water
1:24 ratio
Recommended + ½
3 tsp dye per ½ cup of water
1:8 ratio
1 ½  tsp dye per ½ cup of water
1:16 ratio
2x Recommended
4 tsp dye per ½ cup of water
1:6 ratio
2 tsp dye per ½ cup of water
1:12 ratio


The dye powder measured into scrap paper weigh-boats ahead of time
(Protective mask, eyewear and gloves used of course)
I mixed 3 tablespoons of urea into 3 cups of warmed distilled water to make my chemical water. I used a little bit of this water to paste-up my dye. In a separate cup I poured in nearly a half cup of the chemical water and dissolved a half teaspoon of soda ash into that before pouring it into the dye paste-up. I'd add more chemical water if I didn't quite make it to a whole half cup.
Pasting-up in progress
Golly, for some reason, I thought it would be a good idea to lay out my cotton on plastic wrap and squirt the dye onto it from there. It was not a good idea. My execution left a lot to be desired. First of all, I was shocked when the dye just beaded on the surface of the cotton and then rolled off. Then I was horrified when the dye started to puddle and flow towards the end of the plastic wrap. Look at this stuff. Do you want that spilling onto your countertops and dripping onto the floor? If I made my coffee that black I'd be up for days. Anyway, I resorted to massaging the logs of cotton to encourage them to absorb the dye, which they eventually did. You know, cotton fibers are actually made of layers of cellulose arranged in a particular fashion, with a final waxy coating. I was under the impression that the wax was removed during the process of scouring and washing. So imagine the pit in my stomach upon the realization that the wax was obviously still there, repelling the water. Would it even take the dye? Well, it was too late to turn back now. So I massaged away and then awkwardly wrapped everything up in the plastic wrap.  Time for Plan B.
Ha ha ha look at this slippery blue turd ensconced in plastic wrap. Such a terribad idea
Moving forward, I decided to use sealable bags instead. I put about a half ounce of cotton in each bag. I would then mix up my dye as before, then pour it directly into the bag with the cotton. I sealed the bag and massaged the heck out of that cotton. Once I was satisfied the the dye had been throughly absorbed, I squeezed out as much air as possible and made the final seal.
Eventually, the cotton accepts the dye and the volume decreases.

Rinsing
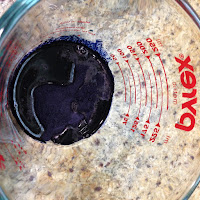
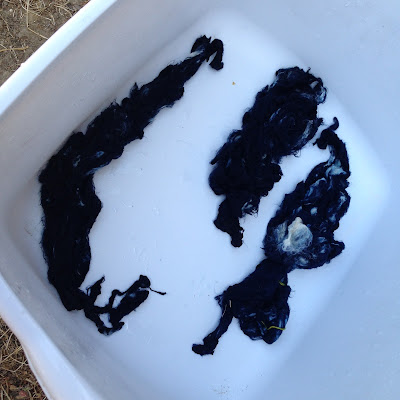
Meanwhile, I warmed up a pot of water on the stove. I took the pot off the heat and put the bags of Jade Green cotton in the hot water bath. The Cobalt Blue bags were unceremoniously dumped in a plastic basin. My plan was to leave all of this stuff outside for 24 hours, but I got a little, um, distracted by someone special and I didn't get to rinsing until 10 hours later than what I had planned. I took the cotton out of the bag and rinsed and rinsed and rinsed and, oh my gawd, blue dye is still coming out and the cotton is still BLACK. You can see the rinse water in the photo. Every bag was like this. My conclusion is that I really went overkill on the dye and don't need that much at all. Also check out the holidays. I need to work on my masseuse skills. Once I was satisfied with the clarity of the rinse water (in all honesty I was just bored waiting) I put it all in plastic basins outside, filled them with water from the hose and let it sit overnight. The next morning the soak water was freakin' dark with excess dye. After one more rinse and a squeeze, look at what I've got.

Conclusions and Results

Cobalt Blue post-soak


Jade Green post-soak
Well, that's certainly more intense than my previous results.  You'll notice there are holidays where the dye didn't penetrate despite my massaging. I did a little combing and compared the different dye batches, avoiding the holidays. I'll still use the undyed fiber, but I really want to focus on the color of the fibers that did get exposed to the dye.
From right to left: Cobalt Blue at 1:6, 1:8, and 1:12 dye to water ratio and Jade Green at 1:12, 1:16, and 1:24 dye to water ratio. The leftmost log for each color represents the recommended ratio.
That's nice and all, but is this what these colors are supposed to look like? Not really. The color came out way darker than the color swatch indicated. Swatch 22 to the left there is for Cobalt Blue, and as you can see, the fibers, even at the very tip of my combed log, are way darker than the swatch. Though my camera is crap at showing it, I'm much closer to 130 Strong Navy. Swatch 50 indicates Jade Green, but the actual fibers are much closer to 153 Mermaid's Dream and 146 Kingfisher Blue.

So freakin' what you say, but here's my objection. If I wanted those colors, I would have just used those dyes. When I did the final rinse, there was way too much dye going down the drain. What a waste of both dye and water. Because of my fuzzy navel experience I went overkill. Don't get me wrong though, I appreciate the level of color saturation for sure, and I'm much encouraged. So, moving forward, here's my plans for next time:

  • Combing the cotton ahead of time was a great idea, though tedious. The fiber didn't tangle during the dyeing process, and after all was said and done, it wasn't that difficult to re-comb it. Next time though, I will make the logs smaller (say, less than a foot long) and less thick (less than three layers of combed cotton) in order to reduce the amount of holidays during dyeing.
  • In no way did I need as much dye as I used. It produced unexpected results and way too much wasted water and excess dye that gets washed out. Next time I will try another experiment, probably with the Jade Green again, because it's such a lovely color. I will try three more batches 3/4 tsp, 1/2 tsp, and 3/8 tsp of dye per 1/2 cup of water. (1:32, 1:48, 1:64 water to dye ratio.) It should be interesting to see which one of those hits the target color.
  • I'm debating whether or not I really need to wash with PTD ahead of time or not.
  • A 1:1 ratio of cups of water to ounces of fiber seemed to work well, despite the holidays in this round. With enough massaging, and making thinner logs of fiber, I think there's plenty of fluid to saturate the fibers.
  • It seems to me adding the soda ash to the dye rather than pre-soaking the fiber in a soda ash solution was key in producing the saturation seen in my samples. It's really the only meaningful difference between this experiment and the tie dye-like direct application method I used. That time I let the fibers sit for over 24 hours as well. While I'm sure letting it sit and develop os important, I think what's more important is to not have fiber that is already wet, thereby diluting the dye.
  • Since I'm not trying to paint the fibers a rainbow of colors at once, there is no reason to use plastic wrap. I plan to keep using sturdy resealable bags. They can be rinses and used multiple times, and they really help me keep everything neat and organized.
Anyhow, I won't be getting to this next experiment any time soon as I have other projects that I need to finish, but I will share my results when I get to it.

Tuesday, June 28, 2016

Bullshit Crafting Product: 001 Decorative Cotton Bolls

Oh what serendipity. I'm in the middle of processing, dyeing, and spinning the cotton that my father and I have grown ourselves. I've also been researching this wonderful fiber to better understand how to do all of these things to it. Then I run into these things, real cotton bolls tied to a wreath or tied to floral wire in a spray. You would think I would be excited about seeing these things, like, "Oh hey, here's a thing I'm totally into right now, made into home decor! I should decorate my house in cotton bolls and then everyone will call me "The Cotton Gal', and I'll be all about that cotton all the time. Oh that wacky LuRo and her cotton!"

Certainly a Good Use of Materials

Lately I have been posting away about my dye experiments with cotton lint, but I'm up to other things as well you know. I made the mistake of liking penguins as a child and people still keep giving me penguin things. I'm not about to start another "thing" ever again. Anyway, being into other things, I reluctantly made a trip to the nearest craft store because there was a thing I needed.

To get to the thing I needed, I had to walk through the now requisite bins and shelves of things that are not crafts. The cotton wreaths and sprays were one of the many non-craft things that were there. Oh sure, you could incorporate those sprays into a floral arrangement, or you could embellish the wreath with other bullshit, but we're cutting really close to Sandra Lee Semi-Homemade territory, and at least she has the excuse of needing to feed herself and her family. No one needs to glue shit to a wreath under such duress that you have to buy a pre-made wreath much like how Sandra Lee makes cake out of pre-made cake.

So instead of moving on with my errand and ignoring the garbage, I stuck around to inspect it because I'm an asshole and love being mad about inconsequential things. The wreath already had a dead mosquito embedded in the fibers. Lovely. Now imagine this thing hanging on your front door or in your house for a season, getting covered in dust and accumulating spiders. How the hell are you going to clean it? Smacking the dust out or vacuuming up the cobwebs would destroy it.

Don't even ask me if I touched it because of course I touched it. It's made of real cotton bolls, and yeah, I kinda pulled the fibers out a little. It's not the greatest cotton. The staple length is pretty short but it is very white. At the price of $29.99, it's certainly not cost effective to rescue the cotton in the wreaths to spin them. The tag also says its made in China, but who knows where the cotton was actually grown, but it was grown somewhere, and in that place the soil was tilled and watered and cotton was planted. It was harvested and instead of being used for making fabric, cotton balls, or topping of the tips of ear swabs, these bolls got sent to some factory where they got tied up to a wreath or twigs of floral wire so that you can display it in your house for a limited amount of time before it gets dirty and ends up in a landfill. It was pretty crappy cotton, so maybe it was going to get tossed anyway, but considering how white and attractive the bolls are, I think not. There's a chance this crap was grown specifically for this application. What a waste.

Anyway let's wrap this up:

Bullshit Scorecard


Dubious qualification as crafting supplies
-5
Great spider-house
-8
Bizarro misuse of materials
-8
Grand Total
-21